
“I can side slip and do falling leaf, but I just can’t turn.”
“I’ve been practicing turns forever, but I’m not improving.”
If you’re new to snowboarding, you’ve probably had these frustrations.
Even if you manage to get comfortable with side slips and falling leaf, many people hit a wall when it comes to practicing turns. Without following the right steps and methods, no matter how much you ride, linking continuous turns just won’t happen.
But if you’re learning, you’d want to master linking turns and enjoy snowboarding even more, right?
That’s why, in this guide, our certified instructors have broken down the process into four clear steps that will help beginners master continuous turns.
If you’ve been self-teaching for a while but can’t seem to nail turns, booking a lesson and getting advice from a pro can speed up your progress dramatically!
Related articles:Start with the Falling Leaf! Beginner Snowboard Steps to Enjoy the Slopes


Key Points for Beginners Practicing Turns Safely
To practice turns without injuries, make sure you keep these points in mind:
Choose soft snow conditions whenever possible
When practicing linked turns, falling is unavoidable. Honestly, I’ve never heard of anyone who learned turns without falling, and such a person probably doesn’t exist.
Since falling is part of the process, you should practice where falling doesn’t hurt too much.
On icy, hard-packed snow, falling isn’t just painful, it’s discouraging. It can even build fear of falling, which blocks smooth progress. Worst case, you might think: “Forget turns—I’ll just stick to falling leaf forever!”
On soft snow, however, falling doesn’t hurt much. Without fear, you’ll practice more actively and improve faster.
That’s why, for beginners working on turns, it’s best to choose resorts with softer snow, ideally in mid-winter (January–February).
In Hokkaido, resorts like Rusutsu or Niseko offer the perfect fluffy snow for practicing turns.
Related articles:Hokkaido: A Powder Paradise! Best Ski Resorts and Tips for Enjoying Powder Snow
Practice on slopes that don’t feel intimidating
Once you can do falling leaf, you might manage to slide down even intermediate runs. But for turn practice, you should always return to gentle beginner slopes.
If the slope is too steep, you’ll pick up too much speed, your posture will collapse, and you won’t manage the turn. Worse, you might develop bad habits that are hard to fix later.
Stick to slopes where you don’t feel scared, so you can maintain correct form.
💡 Basic stance reminder:
Stand straight over your board
Keep your head up
Don’t stick your hips out
Keep your eyes level
Bend your knees slightly
Preparations Before Practicing Turns
Before jumping into turns, there are important skills every beginner should build first:
Learn how to fall safely
Master basic stance
Practice riding one-footed
Get comfortable getting on/off lifts
Practice heel-side side slip
Practice heel-side falling leaf
Ride straight downhill with your board flat
Practice toe-side side slip
If you’ve nailed all of these, keep reading! If you’re unsure about any, check out our guide “Falling Leaf First! Step-by-Step for Beginners to Enjoy the Slopes” before moving forward.
Time to Practice Turns!
With the basics covered, it’s time to practice turns.
(We’ll explain in regular stance here, but don’t worry—lessons always adjust for goofy riders.)
Snowboard turns are about alternating between the heel-side and toe-side edge, creating smooth S-shaped curves down the slope.

Linked turns combine one heel-side turn and one toe-side turn, but doing it all at once is tough. That’s why we break turns down into smaller steps and link them together gradually.
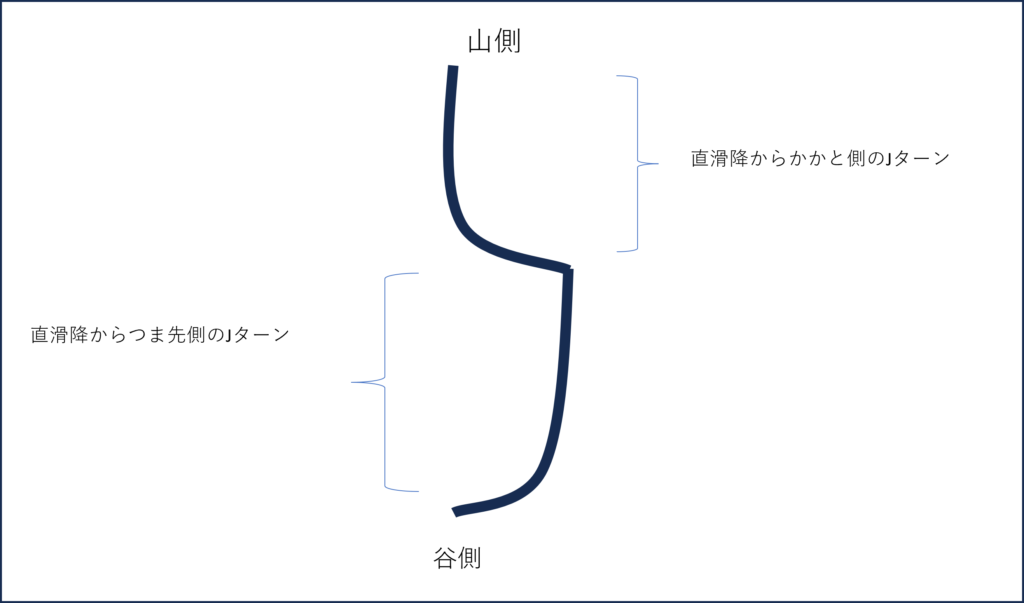
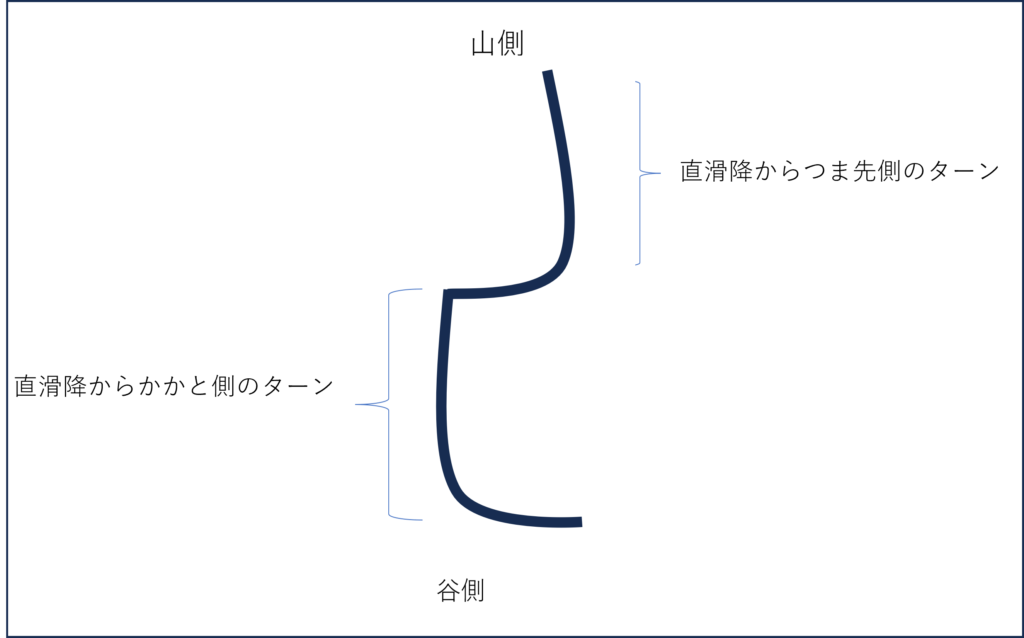
Step 1: Heel-Side J-Turn
Start with heel-side turns, curving left. The movement looks like the letter “J,” hence the name.
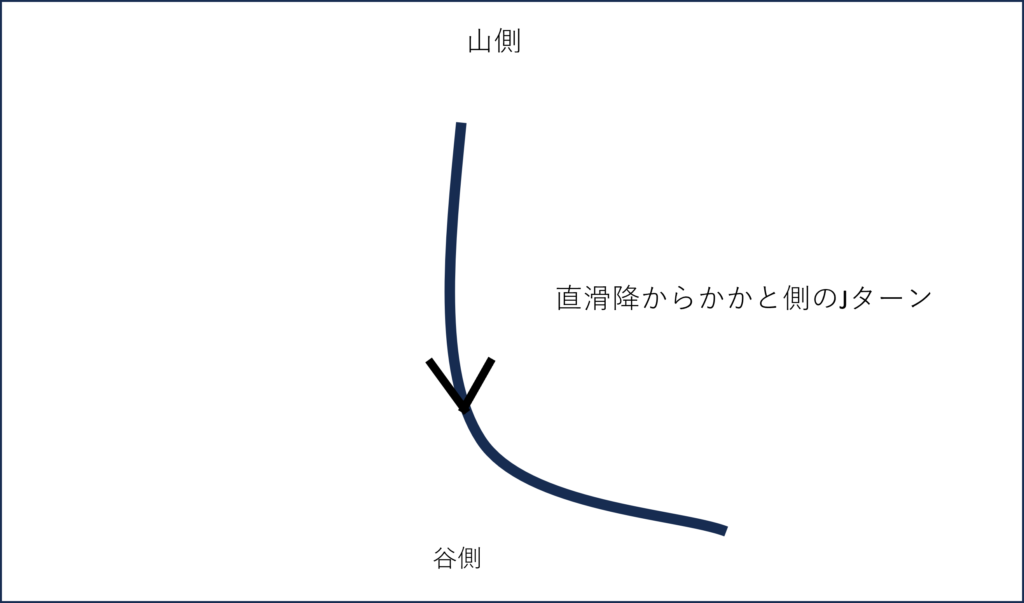
Point your board straight downhill, then gradually lean back against the highbacks from left foot to right foot, guiding the board into a left turn. Keep your stance upright and look in the direction you want to go—your board will follow naturally.
Once your board faces sideways, your speed will slow, and you’ll stop naturally.
💡 Beginner’s Tip
Your gaze is key. Where you look, your body follows. When you look left, your upper body twists left, your lower body follows, and your board turns left too. Looking where you want to go also helps maintain correct stance and balance.
Step 2: Toe-Side Side Slip
Next comes the right turn (toe-side). Most beginners struggle here because it feels like facing backward down the slope—which is scary!
That’s why before toe-side turns, you should practice toe-side side slips.
Start from a crawl-like position facing uphill. Push into the snow with your hands as you slide down. Once comfortable, lift your head, balance, and try sliding without using your hands.
💡 Beginner’s Tip: Focus on:
Leaning gently into the front of your boots
Looking far ahead
Tucking your hips in
Keeping your chest open
If your hips stick out or your head drops, the heel edge will catch, and you’ll fall backward (the dreaded edge catch). Maintaining good posture avoids this.
Toe-side side slip is a major hurdle for beginners. In lessons, instructors support your hands to prevent falls, so if you’re anxious, don’t hesitate to book one.
Step 3: Toe-Side J-Turn
Once you’ve got heel-side J-turns and toe-side side slip, it’s time for the toe-side J-turn (right turn).
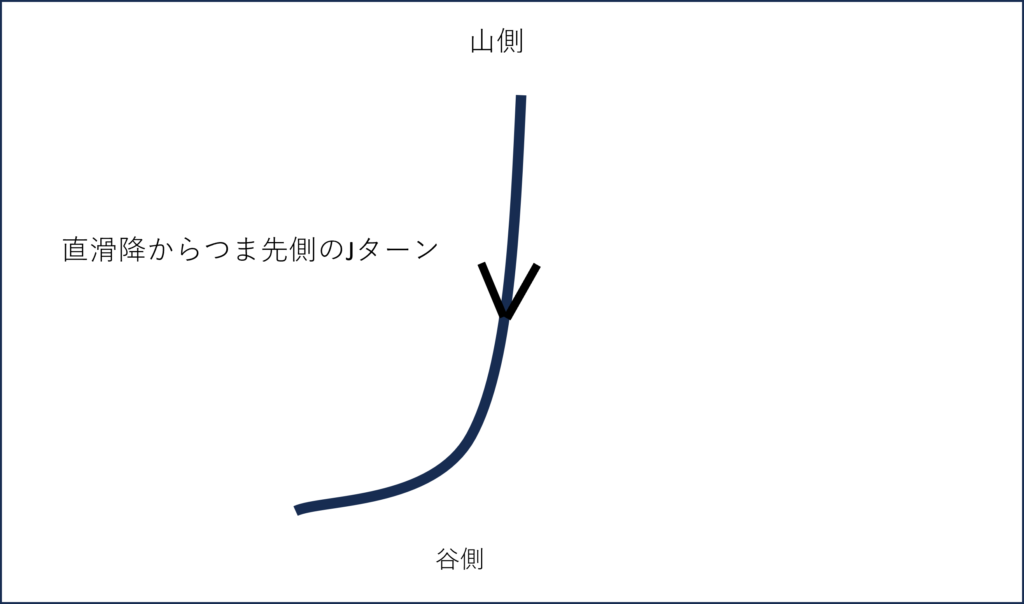
Most people stumble here, so don’t worry if you can’t do it at first—it’s normal.
Start the same way: from a sideways stance, point the board straight downhill. Then gradually lean into the front of your boots, left foot first then right, until the board turns and you end up in the same position as toe-side side slip. That’s your J-turn.
💡 Beginner’s Tip:
The biggest mistake is rushing. Many try to turn before the board is straight, leading to falls. Instead:
First, let the board go straight (flat)
Then calmly lean forward in sequence (left → right)
Keep toe-side stance as the board curves
If fear holds you back, go back to practicing toe-side side slip. Once that feels natural, turns will come easier.
Step 4: Linked Turns!
Once you’ve got both J-turns, you’re ready for continuous linked turns!
It’s just about connecting your heel-side and toe-side J-turns. After finishing one, point your board straight again, then switch into the other. Repeat this rhythm down the slope.
The key is to look where you want to go (downhill). Your board will naturally follow your gaze into the next turn.
Another crucial point: relax. Tension stops the board from moving smoothly. Practice on gentle slopes where you feel safe, stand relaxed, and let the board flow.
💡 Beginner’s Tip:
Don’t rush between turns. Wait until the board points straight downhill before starting the next turn. Beginners often panic and try to turn too soon, losing balance. Practice patiently on mellow slopes—relax, relax, relax!
Conclusion: Why Lessons Are the Best Way to Master Turns
For beginners, learning turns can feel tough. Sometimes you don’t even know which slopes are safe to practice on and end up on dangerous runs.
That’s why, if you want to master turns safely and efficiently, lessons are highly recommended.
With lessons, you’ll:
Practice on slopes tailored to your level
Get supported by instructors so fear doesn’t take over
Receive instant feedback on what went wrong
Avoid bad habits from self-teaching
If you’re thinking, “I want to practice turns safely,” “I want to master turns as quickly as possible,” or “I’m hitting the limit with self-teaching,” definitely consider joining a beginner’s lesson.
And if you have any questions about lessons or practicing turns, feel free to reach out to us at Samurai Snow Concierge—we’ll be happy to help!


コメント